Wednesday 30 August 2017

The Heart of Christmas - Week 14


Hi everyone and welcome to another Wednesday posting, in our Art with Heart Team's - Heart of Christmas inspirational projects. We're up to Week 14, and the wonderful creations will continue right through until the end of November, so be sure to check in each week to see what we have created.

This week I decided to make my own DSP. So I started with an A4 piece of Whisper White cardstock and then I grabbed every current stamp set that had a Christmas greeting/sentiment and with my Real Red ink, I began stamping. 


Starting with the bold Merry Christmas from the 'Merry Mistletoe' set, and filling in the remaining spaces with the 'Oh, What Fun' set, 'Santa's Sleigh', 'Hang Your Stocking' and 'Star of Light' just to name a few. It was really fun to make and I certainly recommend giving it a try. When the spaces became too small for the words, I then used stars from the Star of Light set, which filled in those little gaps perfectly.

And here is my first card, now I say first, because I was able to create 3 cards and some tags. So for the next few weeks I will share all of these with you. I had no idea of what sizes I wanted to make the cards, but I did begin with a standard size of 5 1/2" x 4 1/8" when folded.


I've used a Whisper White card base and layered with a piece of Crumb Cake and then I cut the DSP an 1/8" smaller than this. I wrapped a piece of the 1/4" Quilted Christmas Ribbon, from the Christmas/Holiday Catalogue, around these two layers. Next, I cut out a Stitched Shape Circle die from Crumb Cake, and onto this I added the gorgeous star from the Stitched Felt embellishments out of the Quilted Christmas Suite of products, and the star is popped up with our dimensionals and they stick perfectly to the felt. I had to add a bow made with the Linen Thread, and I think it's a great match with Crumb Cake.


Here's a close up shot of the star embellishment - I just love how this looks!


Inside the card I added a piece of Whisper White, cut an 1/8" smaller, and then I stamped the sentiment from the 'Christmas Quilt' stamp set in Real Red onto a Stitched Shape Circle and popped on a little Garden Green Enamel Shape star.


The finished card. 

I had so much fun creating the DSP and I'm really looking forward to showing you the other projects I made with it, over the next few weeks. In the mean time, hop across to Claire's blog, to see what she has made this week and check out the list of the other lovely ladies who joined in, sharing their Christmas creations this week.

Until next time...
Happy Crafting 😊


Thursday 24 August 2017

AWH Team August Blog Hop - Holiday Catalogue


art-with-heart-team-blog-hop-logo-current


Tonight I'm joining some of the Art with Heart Stampin' Up! Team girls in sharing some fun and fabulous ideas to inspire you from our brand new Holiday Catalogue available on September 1st until 2nd January 2018. If you don't have a copy and would like one, simply let me know and I will post one out to you.

For my project, there was no question as to what I was going to use, it had to be the Quilted Christmas Suite.
This is such a beautiful suite of products from the DSP to the fantastic Framelit dies and everything in between.
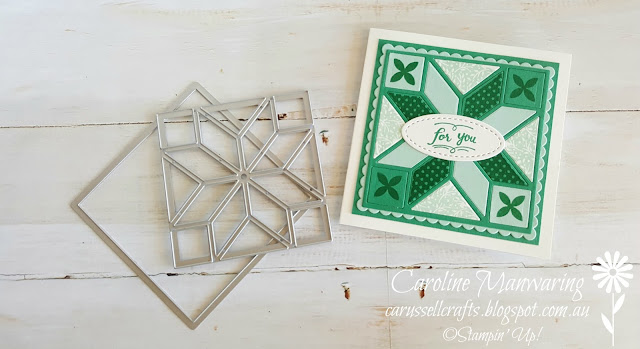
I have created this framed sampler and matching note card in the gorgeous colours of Emerald Envy, Pool Party and Whisper White.

 I started with a piece of Whisper White card stock which I stamped around the edge in Pool Party ink, using the 4 point petal stamp from the 'Christmas Quilt' stamp set. Next is a piece of Emerald Envy, and here I used the little blanket stitch stamp, and stamped all the way around the edge using Emerald Envy and then I embossed a piece of Pool Party using the Quilt Top TIEF. Now for the little quilt blocks, I used both Emerald Envy and Pool Party inks in each of them. The one on the left has a Pool Party outline frame and the one on the right has a Whisper White frame. Both have been backed with a Scalloped Layering Square Framelit. For the actual block, I cut a 3" piece of card stock and adhered a piece of our Multipurpose Adhesive Sheets to the back, before running it through the Big Shot. The use of the adhesive sheet made it so easy to put the blocks together, especially the frame as it is quite fine and flimsy to handle. The adhesive gives firmer pieces to work with. When stamping the star pieces for the blocks, I found it easier to ink up the stamp and then lay the pieces directly onto the stamp as the stamp is slightly larger than the die cut pieces. Unfortunately I realised after I had stamped the first block that this was the case, but easily managed if you apply my little tip. It's so much easier to see where you're stamping. To get a good stamped impression, I use another acrylic block and press down over the top.

You can see what I mean in this photo below.

I wrapped some embroidery thread around the little cotton reel, (I managed to find almost a perfect match for Emerald Envy), and threaded the needle - both of these are simply the cutest little dies in the Quilt Builder Framelit Dies set. The little sentiment "When life gives you scraps, make a quilt" is another stamp in the Christmas Quilt stamp set. It is stamped in Emerald Envy and die cut with a Stitched Shape Oval and backed with a scalloped oval.

Add a little note card, and this gift set is complete. (The greeting is from the 'Wood Words' stamp set in our Annual Catalogue)
I had so much fun making this project and I look forward to using this fabulous suite of products a lot more.
Thanks for stopping by on your way through our hop, I hope you're enjoying all of the wonderful creations and feeling inspired.

Now it's time to hop on over to our next participant, the very lovely and talented Catherine Proctor.

art-with-heart-team-next-blog-hop-current

If you find a broken link or have come to this blog hop from a different entry point, you can view the participants listed below:


Until next time...
Happy Crafting 😊


Wednesday 23 August 2017

The Heart of Christmas - Week 13


Hi everyone and welcome to Week 13, as we continue our Art with Heart Team countdown to Christmas, sharing our Heart of Christmas inspiration creations with you every Wednesday. I know that we are all enjoying making and creating something different to share with you each week.

It's GOLD, gold, gold for my card this week.

After receiving a sweet little pack of gorgeous embellishments from a share I was in, and a surprise prize for sharing some photo's on our teams Facebook page from our lovely team leader Claire, I just had to use some of them on my card this week - and for photo props too!
I've made a Thick Whisper White card base and layered this onto a piece of Gold Foil Sheet and then a piece of the gorgeous Year of Cheer Specialty DSP, I created the frame around this with the Card Front Builder Thinlits. The stocking is cut using the Christmas Stockings Thinlits Dies. I cut two - one for the white solid and one for the gold overlay, the little hanger is also a die from the set.
Merry Christmas is stamped in black and die cut with a Circle Stitched Shape Framelit and layered onto a gold Scalloped Layering Circle Framelit and I've just popped it up on dimensionals. Oh, and don't waste those tiny little stars from the frame cut outs, they can be used too and they're so cute!

Now for the inside, I cut a piece of Whisper White and used the Card Front Builder die again to create the frame. You do have to partially cut one side and then reposition the die to cut the opposite side to get this look. It's a matter of positioning your top acrylic plate only over the area you want to cut. I've added a strip of the Year of Cheer DSP to the bottom. The sentiment is from the 'Hang Your Stocking' stamp set as is the greeting on the front of the card. I love the Black Rhinestone Jewels in the new 2017 Holiday Catalogue, and you can see where I have placed them in the photo below.
Well that's it for this week friends, tune in same time, same place next week as our Christmas countdown continues.
Don't forget to check out all of the other great projects the team has created by popping over to Claire's blog by clicking here. As always, Claire will have a list at the end of her post, of the other lovely ladies who have posted on their blogs this week for our Heart of Christmas.

Until next time...
Happy Crafting 😊


Wednesday 16 August 2017

The Heart of Christmas - Week 12


Welcome everyone to this weeks Heart of Christmas blog post. We are up to Week 12 of sharing our Christmas inspiration projects with you all, from the Art with Heart Team.

For my card this week I have gone monochromatic, using the elegant combination of black, white and silver.

 Certainly not common colours seen on a Christmas card, but I think the combination here is just stunning!
Since receiving my pre-order goodies last week, I knew that I wanted to create a card using the beautiful Merry Music Specialty DSP and the 'Carols of Christmas' stamp set. The DSP consists of just Whisper White and Basic Black, and the designs are fantastic!
I love the detail in the font of the sentiment. I have seen it stamped in other colours and it looks amazing - imagine it embossed in gold or silver.
The card base is Whisper White and layered with the white sheet music on Basic Black and then I have reversed the next layer - black on Whisper White. 
Deck the Halls is stamped in Memento Tuxedo Black and die cut with a straight edge Layering Square Framelit and backed with a scallop edge square from the same set. I have Silver embossed five of the larger flowers onto Whisper White and Basic Black, from the Carols of Christmas stamp set and die cut with the matching Card Front Builder Thinlits and added a Rhinestone to each of the centres.
The Basic Black Shimmer Ribbon is so gorgeous and I just had to add some to this card.

In this photo you can see the shimmer and shine on the ribbon and embossed flowers.


The inside sentiment is from 'Merry Mistletoe' and the little underline stamp is from Carols of Christmas. 

Click here to pop over to Claire's blog, our lovely team leader, and see what she has created this week. At the end of her post she will also have a list of the other team members who participated in Week 12 of the Heart of Christmas. 💖

Until next time...
Happy Crafting 😊


Thursday 10 August 2017

The CASE of the Double Slider Card.


Hi everyone. I love reading, although I don't get much of an opportunity these days because I'm too busy making gorgeous cards and paper craft projects with our fabulous range of Stampin' Up! products, but I do love a good mystery novel, hence the title of this blog post today. Especially gothic romance ones like Daphne Du Maurier's 'My Cousin Rachel'. Goodness me, that's enough waffling on about reading! I'm not going to write a mystery novel for you today, but I am going to share with you the mystery behind the making of this fantastic card. It is a CASE of one I found on YouTube. For those not familiar with the term CASE - it means; copy and share everything.


The designer of this card is Samantha Clayton of Mixed Up Crafts. And you can find her blog post for the card here.
As soon as I saw this card, I knew I just had to make one. I have made a few changes to mine but basically it has the same sliding mechanism. It is a very clever design and I thank Samantha for sharing it.


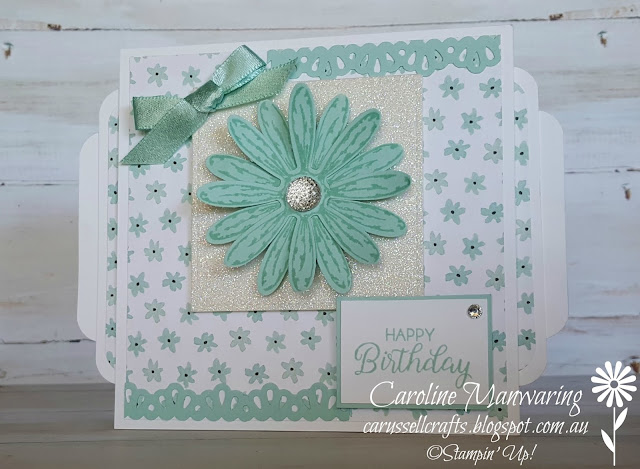
I have used Thick Whisper White, Dazzling Diamonds Glimmer Paper and Pool Party cardstock, Whole Lot of Lovely DSP and the Daisy Delight Bundle, some Pool Party Shimmer Ribbon, Decorative Ribbon Border Punch, and embellished with the Clear Faceted Gems and Basic Rhinestones and for ink I have used Pool Party.

It is a free standing card and would look lovely displayed on a mantelpiece or anywhere you love to show off your special cards.


Here is a little video showing how it slides.


If you love a bit of "WOW" in your card making, then this is the card for you. I'm sure whoever is lucky enough to receive one of these is going to absolutely love it!
I found it quite easy to put together following the great tutorial from Samantha, so why not give it a try?!


 Thanks for stopping by today. 
Until next time...
Happy Crafting 😊


Wednesday 9 August 2017

The Heart of Christmas - Week 11


Welcome to Week 11 in our Art with Heart Team Christmas inspiration countdown.
We are sharing weekly projects, posted every Wednesday, with a Christmas theme. This will be done each week until the end of November, so be sure to check out the teams previous projects over on Claire's blog, our wonderful team leader.

This week I'm sharing another simply made card. 

 I have made a card base in Thick Whisper White and layered it with a piece of Night of Navy.
Next I stamped about a half inch of gravelled road in Night of Navy ink along the bottom. These little stones come from the Hostess Set - 'In the City'. The gorgeous swirl of stars and the corner stars are from 'Star of Light' stamp set, stamped with Whisper White Craft Ink.

 How proud does this reindeer look, standing in the lovely moonlight?

He is from 'Santa's Sleigh' stamp set and I have stamped him tone on tone onto Smoky Slate cardstock and die cut with the matching framelits to the set, as is the little bow around his neck, which is cut from our Silver Foil Sheets. The moon is cut from Dazzling Diamonds Glimmer Paper with one of our Layering Circle Framelits.
The greeting has been stamped with VersaMark and heat embossed with White Stampin' Embossing Powder.

 For the inside of the card, I have again used the swirl of stars from the Star of Light stamp set, stamped in Smoky Slate and the sentiment is from 'Hang your Stocking' stamp set, stamped in Night of Navy.

Adding little touches of sparkle is easy with the Rhinestone Basic Jewels.

Thanks for stopping by this week. Don't forget to have a look over on our lovely Claire's blog to see what she has made this week. At the end of her post she will have a list of the girls who have joined in this week too. Be sure to check out their blogs as well and enjoy the Christmas inspiration we love sharing with you all.


Until next time...
Happy Crafting! 😊


Wednesday 2 August 2017

The Heart of Christmas - Week 10


Hi everyone and welcome to Week 10 of sharing
our Christmas inspiration with you from the Art with Heart Team.

From the soft shades of Powder Pink on last weeks card to the bright and beautiful combination of Real Red and Whisper White this week.
This is a simple design and could be mass produced quite quickly. It would look gorgeous in any colour I think too. Can you imagine it in green or blue? 


I have used images from the sweet 'Feathery Friends' stamp set. It is a Hostess set and is shown on page 221 of the Annual Catalogue.
Even though it isn't a Christmas stamp set, I think it makes a lovely, fresh and contemporary card.
The card base is Thick Whisper White and matted with Real Red and a piece of Whisper White that has been stamped all over with the flower sprig from the stamp set. The greeting is from the 'Merry Mistletoe' set. Stamped on Whisper White and matted with Real Red - it's bold and beautiful.
The little bird is so sweet and looks great in this oval from the Stitched Shapes Framelits and backed with a Layering Oval Framelit.
For a little bit of sparkle, our Basic Rhinestones are perfect, and here I've added them in the flower centres. The bow is made using the Metallic-Edge Ribbon in silver. Gold is also available, and it is a stunning ribbon in both colours.


For the inside, I always like to add an insert of just a piece of photocopy paper. I think it finishes off the card nicely. Here I have stamped the lovely sentiment from the Merry Mistletoe stamp set and attached a 1" strip of Real Red that I stamped randomly with the flower sprig to tie in with the front of the card, and again I've added a single Rhinestone to the flower centre.


I decided to make a little Christmas bon-bon to go with my card this week. I gave one of these to each of my lovely ladies at our last Christmas card class last year and it is really surprising just what you can fit inside them! It is made on the Envelope Punch Board and I started with a 6" square of Whisper White stamped all over with the flower sprig again. The greeting is from Santa's Sleigh' and the ends are tied closed with the gorgeous silver metallic edged ribbon. Two star Enamel Shapes added to the bon-bon bring some solid Real Red colour to it, I think it really helps to 
match it with the card.
This would make a lovely little gift set to give to someone who has done something special for you. 
And it would be "extra special" if you stamped it in their favourite colour.
Well, I hope you're getting plenty of inspiration for your Christmas creations, as the Art with Heart team girls post their projects each Wednesday.
Pop over to Claire's blog to see what she has made and to check who is also joining us this week. 

Until next time...
Happy Crafting 😊