Thursday 28 September 2017

Eastern Palace Masculine card

When it comes to creating a masculine card, do you inwardly cringe and maybe pull a funny face? 
I know I struggle a little with ideas and I don't think I'm alone.
But as I have found in the past, Eastern Palace Specialty DSP certainly comes to mind for a masculine card.


I wanted something simple and quick to make and this card is just that - quick and simple; but it does have an elegant style in its simplicity.
I've made a Dapper Denim card base and matted with Very Vanilla and a piece of the dapper denim/gold foil DSP. Then I cut two scalloped circles in Gold Foil and the DSP, and a regular circle for the birthday greeting out of VV. The greeting comes from the 'Special Greetings' stamp set and I have used the matching sentiment inside the card.


I added a 1/2" strip of the DSP on the left-hand side before I stamped the sentiment, so it was centred.
So, one quick, simple and easy masculine card made; not so difficult when using the Eastern Palace Specialty DSP and lovely greeting and sentiment stamps.
You've just got to love Stampin' Up! They make everything so easy with their great products.
If you would like to purchase any of the products that I used to create this card, I have a 'Shop With Me' button on the right hand side of my blog.
If you're in Australia and don't have a Stampin' Up! demonstrator, I'd be more than happy to help you with any questions you may have about the company; just send me a message.

Until next time.....
Stay happy and stay crafty! 😊

💖


Wednesday 27 September 2017

The Heart of Christmas - Week 18


Hi crafting friends and welcome to Week 18 of The Heart of Christmas.

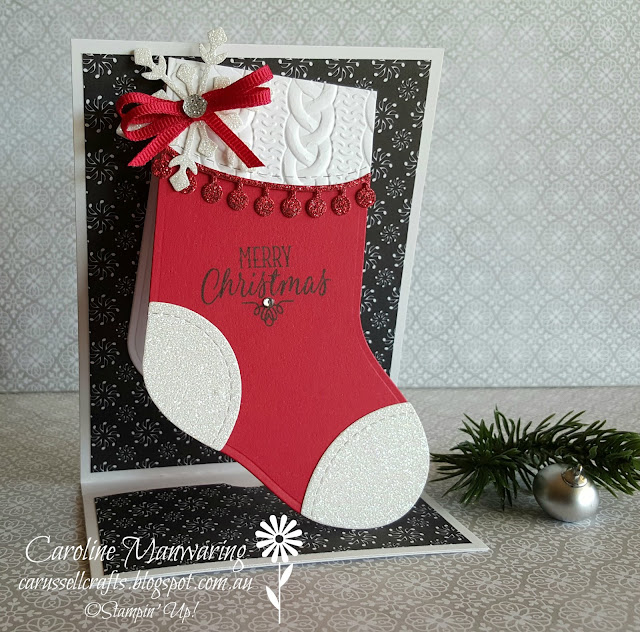
For this weeks card I have been playing with the Trim Your Stocking thinlits dies from the Christmas/Holiday catalogue. It has a coordinating stamp set called 'Tags & Trimmings', and if you buy them as a bundle you'll save 10%; but for this card today I didn't use the stamp set.


This is a joy-fold card with a pocket for a gift card inside. I cut two stockings, one in Real Red for the front and one in Whisper White for the inside. The die set comes with some other gorgeous elements to embellish the stocking and as well as a cuff, heel and toe as shown above. I've cut the bauble trim in Real Red glimmer paper and the snowflake, heel and toe from Dazzling Diamonds. The cuff was cut from a piece of Whisper White and embossed with the Cable Knit 3D Dynamic TIEF.
The sentiment and greeting are stamped in Basic Black and are from the 'Hang Your Stocking' stamp set in the Annual Catalogue.


 I added a clear faceted gem and a Real Red double bow to the centre of the snowflake. The ribbon I have used is retired but there is a beautiful solid 1/8" ribbon in the Christmas/Holiday catalogue on page 29.


If you didn't want to add the gift card pocket you could leave it off and just cut your DSP to cover the bottom panel, leaving a 1/4" border all around. The DSP is Merry Music and as you can see the card base is Whisper White.


This is how I cut the stocking pieces: with the red piece I cut just below the scored line that is created when the stocking is cut out. The scored line is curved and it creates the top of the pillow box, but for my card it wasn't needed. Because the back edge of the stocking is straight and even, it is very easy to line up to the buffer on the Stampin' Trimmer. It will measure about 5 1/4" to the toe, I then scored it at 5". With the white piece, I trimmed off just shy of 5" and glued this to the red piece to create the two piece stocking. The scoring of the red piece makes a narrow 1/4" tab to glue the white piece to.


I had so much fun making this card and I love the way it stands for presentation - soooo cute!

That's it for another week friends, they sure are flying by.
If you would like to see some more projects from this weeks Heart of Christmas, just pop over to the blog of our team leader, Claire, to see who has participated in week 18. 

Until next time.....
Stay happy and stay crafty 😊

💖


Sunday 24 September 2017

Stampin' Up! Baby Stockings.

Hi crafting friends, I've had a lovely day in the craft room today creating something that I think is just so adorable, that I wanted to share them with you.


These gorgeous little stockings were made using the Trim Your Stocking thinlits dies from the Christmas/Holiday catalogue. I've made them with the Bundle of Love Specialty DSP, some Dazzling Diamonds glimmer paper and Very Vanilla cardstock.


Girls first - I've chosen one of the Blushing Bride patterns from the Bundle of Love DSP, There are 3 designs in the pack and the other colours are Soft Sky and a beautiful gold foil. To match the pattern in the DSP, I decided to use the Sweetheart embossing folder for the cuff and the stocking is embossed with the Quilt Top TIEF.


Soft Sky for the boy's one. Both of the little stockings have the glimmer paper heel and toe, and a little snowflake. The 'made with love' is from the 'Labels to Love' stamp set and is heat embossed in silver embossing powder and die cut with a stitched oval.
I've added an enamel heart shape to the snowflake in Soft Sky.


On the back I have cut another stocking in Very Vanilla and if you're using this as a tag, this is where you would write your message. I also think this would be cute as a little Christmas tree ornament. If I was making it as an ornament, I would cut another stocking in the DSP and remember to cut on the reverse of the pattern you want to match. For the little hanger, I have used some retired Very Vanilla ribbon, but there are plenty of beautiful ribbons in the Annual Catalogue that you could use instead.


Above are a couple of other options for decorating. On the blue one, I stamped the name using the 'Brushwork Alphabet' stamp set, and fussy-cut this out. I added a clear faceted gem to the centre of the snowflake and didn't use the heel and toe. On the pink one, all I omitted was the embossing on the stocking. I rounded the top corners to soften and I think this adds to the overall cuteness of them.

Well that's where I will leave you lovely friends, thank you for stopping by today.

Until next time.....
Stay happy and stay crafty 😊

💖


Thursday 21 September 2017

AWH Team - Fancy Folds - September Blog Hop


Hi crafting friends, and welcome to another Art with Heart Team blog hop where we are focusing on Fancy Folds.
You will find loads of creative inspiration tonight, showcasing different folding techniques and projects. Don't be afraid of trying some Fancy Fold cards; they may look intimidating, but in fact, they are not that difficult to create.
So grab that cuppa, you deserve it, sit yourself down in your favourite chair and enjoy our blog hop.

My Fancy Fold is an Infinity or a.k.a a Never Ending card.

Front of the card.
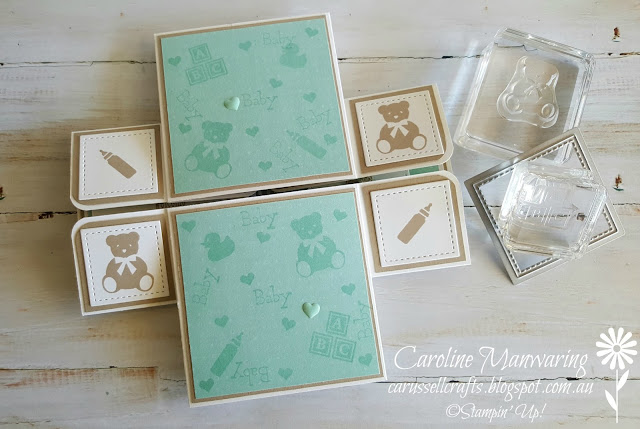
You start with four pieces of cardstock that measure 6" x 3", and when glued together, they fold over each other again and again and again hence the name - Infinity/Never Ending card. It is such a clever fold and I really enjoyed decorating it as a baby card for a friend's daughter, who is having her third child in October, a little boy. I've used the colours Crumb Cake, Pool Party and Whisper White.
For the DSP, I chose Petal Garden, which is a 6" x 6" pack in the Annual Catalogue and some Year of Cheer from the Christmas/Holiday Catalogue.
We don't have any "baby" related images in our patterned papers, but I feel the ones I chose are soft and subtle and perfect for a baby card. A number of stamp sets were used for the images and sentiments, and I enjoyed inking up sets I hadn't used before.
For the front of the card I have used the following:
'A Little Wild'
'Bookcase Builder'
'In the City' (Hostess set)
'Labeler Alphabet'
and
'Special Celebrations'
See if you can work out which stamps belong to which set. 😀

Fold 1.
The side and centre panels have been matted with Crumb Cake and DSP. The sides are in one of the lovely soft Pool Party designs from Petal Garden and just peeking out from underneath the centre squares is one of the Year of Cheer designs. I stamped directly onto the side panels using Pool Party ink. These images from the 'Bookcase Builder' stamp set are so gorgeous! I have die cut a stitched square for the writing panel and a smaller one for the Crumb Cake teddy bear. I've added a little enamel dot to his bow. Cute!

Fold 2.
More stitched square shapes, some Sweet & Sassy hearts and this gorgeous sentiment from 'Bookcase Builder', make up the decorations for this fold.  I've created a little bit of my own DSP by stamping more baby images from the same set, again onto the Petal Garden DSP.

Fold 3.
Here you can see that stamped DSP better. It's really rather cute!


And here we are back at the front of the card, where I took a close up photo of the little bear with his Linen Thread bow.

I have made a little video of how the card folds. You can watch it below by clicking on the arrow.


Well friends, I'll leave you now to continue on your tour of our blog hop. Next up is the lovely and very talented Ros Davidson - I can't wait to see what she has created and all of our other equally lovely and talented team members who have joined in our Fancy Folds blog hop.

AWHT Blog Hop Next blog button

If you find a broken link or have come to this blog hop from a different entry point, you can view the list of participants below:


Until next time...
Stay happy and stay crafty! 😊

💖


Wednesday 20 September 2017

The Heart of Christmas - Week 17


Hi crafting friends - Welcome to Week 17 of the Heart of Christmas.

Today I'm sharing the last of my hand-stamped DSP projects with you. I enjoyed making all of them and I am going to try the same method again, except with Birthday sentiments next time. I think it's a great idea and just imagine how many cards you can stash away so you're not rushing to make that last minute card.

So without further ado.....

Here are the tags I made using the Scalloped Tag Topper punch. 
These little felt embellishments made decorating the tags so simple and I've used the gorgeous Quilted Christmas 1/4" ribbon for the ties. They match perfectly with the cards that I have made and shared here with you over the past three weeks. 


I added the 'to and from' on the back of the tag, and it is from the 'Oh, What Fun' stamp set in the Annual Catalogue. They are stamped in Real Red and cut out using a Stitched Circle die.


The photo above, shows what I had left over after making three cards and three tags and using a couple of strips for the inside of one of the cards. So just a little reminder - I used a sheet of A4 Whisper White and Real Red ink to create the DSP.


Just imagine this stamped in Garden Green or Night of Navy, (ooh, Night of Navy!), or a combination of colours. As I suggested before, why not give it a try yourselves? 
It's fun!


That's it for this week friends. Our lovely Claire is back at the helm this week, so be sure to hop over to her blog and check out her project and the list of our equally lovely team members who joined in this weeks Heart of Christmas.


Until next time.....
Stay happy and stay crafty! 😊

💖


Wednesday 13 September 2017

The Heart of Christmas - Week 16


Hi Crafting friends, welcome to Week 16 of The Heart of Christmas with the Art With Heart Team.

This is the final card that I have made with my hand-stamped DSP. I continued with the theme from my two previous cards, and next week I will share what I made with the left over pieces of the DSP.


Not only is stamping your own DSP fun and relaxing; by choosing greetings, it eliminates the need to stamp a sentiment. And with the amount of beautiful Stampin' Up! Christmas stamp sets available, the choice is almost endless. This method would look fantastic with birthday sentiments too!
You really should give it a try - I highly recommend it.


The gorgeous felt embellishments really add another dimension to the card and I love matching them with the Stitched Shapes Framelits. 
Once again I wrapped a piece of the Quilted Christmas ribbon around the DSP and Crumb Cake layers, tied a knot and added a Linen Thread bow.


The card measures 7 1/2" x 4 1/4" when folded. I wanted a longer, narrower card for this design and I will make an envelope on the EPB, in some Real Red Envelope Paper that I have left over from last years Christmas/Holiday catalogue, which will match beautifully with the colours in the card.


Inside the card I glued down a matting of Crumb Cake and Whisper White, stamped the sentiment from the 'Christmas Quilt' stamp set in Real Red and added two narrow strips of my DSP that were left over cut offs. It's different, but I think it works okay; it brings the outside in, so to speak. 

Well I'm almost at the end of sharing the projects that I made using my own hand-stamped DSP. Check back next week to see the last of my Christmas inspiration makes.

In the meantime, head on over to the lovely Tina Gillespies' blog to see what she has made this week, and there she will have a list of our team members who joined in this weeks, The Heart of Christmas - Week 16.

Until next time...
Stay happy and stay crafty! 😊

💖


Wednesday 6 September 2017

The Heart of Christmas - Week 15


Hi crafting friends, welcome to Week 15 of The Heart of Christmas. Join the Art with Heart team each Wednesday as we share our Christmas projects to help inspire you on your way to making your own stash of cards and other projects for Christmas.

Here is my card for this week.


If you saw my post last week, you would have seen that I created my own DSP.

(here is a little reminder)

This is my second card from this piece of homemade DSP.

The card measures 5" x 10" and is scored @ 5".

I have kept with the theme of Crumb Cake and Whisper White and the gorgeous Stitched Felt Embellishments, this time I've used the tree, and from the 'Christmas Quilt' stamp set I stamped the tree base in Real Red onto Crumb Cake. These products are from the Quilted Christmas Suite, on pages 4-5 of the Christmas/Holiday catalogue, and I just love this whole suite.


The tree was adhered to the Stitched Circle Framelit with dimensionals, as was the tree base.
I added a Whisper White Bakers Twine bow and as an after thought I popped on top of the tree an Enamel Shaped star. ( I added it after this photo was taken, but you can see it in the main pic).
And as I did with last weeks card, I wrapped a piece of the 1/4" Quilted Christmas Ribbon around the DSP and Crumb Cake layers.


On the inside of the card, I stamped off twice to get the tree image in the softer shade of Garden Green and then over the top I've stamped the lovely sentiment in Real Red.


Thanks for joining me and our team of lovely ladies again this week, be sure to stop by every Wednesday to see what the team has made for our Heart of Christmas blog posts.
For the next two weeks the lovely Tina Gillespie will have the list of participants over on her blog, so hop across to check that out.

Until next time...
Stay happy and stay crafty 😊💖


Friday 1 September 2017

A day just for Dad's.


Hi everyone, I just popped on to share a couple of cards I made for Father's Day, which is this Sunday here in Australia.

For those of you who follow my blog, you may remember this Chocolate Box card from our Art with Heart's Team, June blog hop. I designed this to fit a 200g size Cadbury chocolate block, and I wanted to make it again for a Father's Day gift.


Here, I have used Basic Black cardstock, a little Very Vanilla and some Christmas DSP, which in this instance, is a great design for a masculine card. The DSP is from our Christmas/Holiday catalogue, which went live today - yay!
The name of the DSP is Christmas Around the World, and is on page 29 of the catalogue. If you don't have a copy yet and would like one, just let me know and I will pop one in the post for you.


On the inside, I added a piece of Very Vanilla for the writing panel.


The greeting on the front is from the 'Guy Greetings' stamp set in the Annual Catalogue and it was stamped onto Very Vanilla and cut out with a regular Layering Oval Framelit die and mounted on a Basic Black scalloped oval. It looked a bit plain, so I added a bow-tie made with the Bow Builder punch.

This next card I made is for my hubby.


I've used Night of Navy, Smoky Slate and Whisper White. This card design was CASE'D from Dawn Griffith, an Independent Demonstrator from America, it is called a Z Fold Gift Card Holder and she has a video tutorial on YouTube.


Again, I have used images and words from the 'Guy Greetings' stamp set and dry embossed using the Cable Knit Dynamic TIEF. 


I really like the way this cards sits up. You certainly can't buy this style of card in the shops, and there is something very special about handmade cards - don't you think?

Well that's it for today, thanks for stopping by.

Wishing all dad's a very Happy Father's Day on Sunday.

Until next time...
Happy Crafting 😊