Wednesday 29 November 2017

The Heart of Christmas - Week 27


Hello friends and welcome to the last of our Heart of Christmas weekly blog posts from the Art with Heart team. I have really enjoyed participating in this weekly hop with my team members and I hope you have enjoyed seeing all of the great projects we have made. I have a lovely stock pile of Christmas cards ready to send out to family and friends and I have been so inspired by all of the wonderful creations that the team have shared with all of us over this series. Special thanks to our lovely team leader Claire Daly for the idea. I only started my blog this year and this weekly hop has certainly given me great exposure to the world of bloggers and followers, so thank you Claire and my sister team members who are always encouraging with their lovely comments. 

Today I thought I would share with you the little thank-you gifts that I made for the ladies who come to my monthly classes.


I found these yummy chocolates, (they truly are delicious!! - ask me how I know😉), while grocery shopping last week and thought that they would be just the thing to pop into these mini star top bon-bons. I followed a YouTube tutorial on how to make them and chose some designs from the Be Merry DSP and the little sentiment is from the 'Wood Words' stamp set. 


They turned out sooo cute!

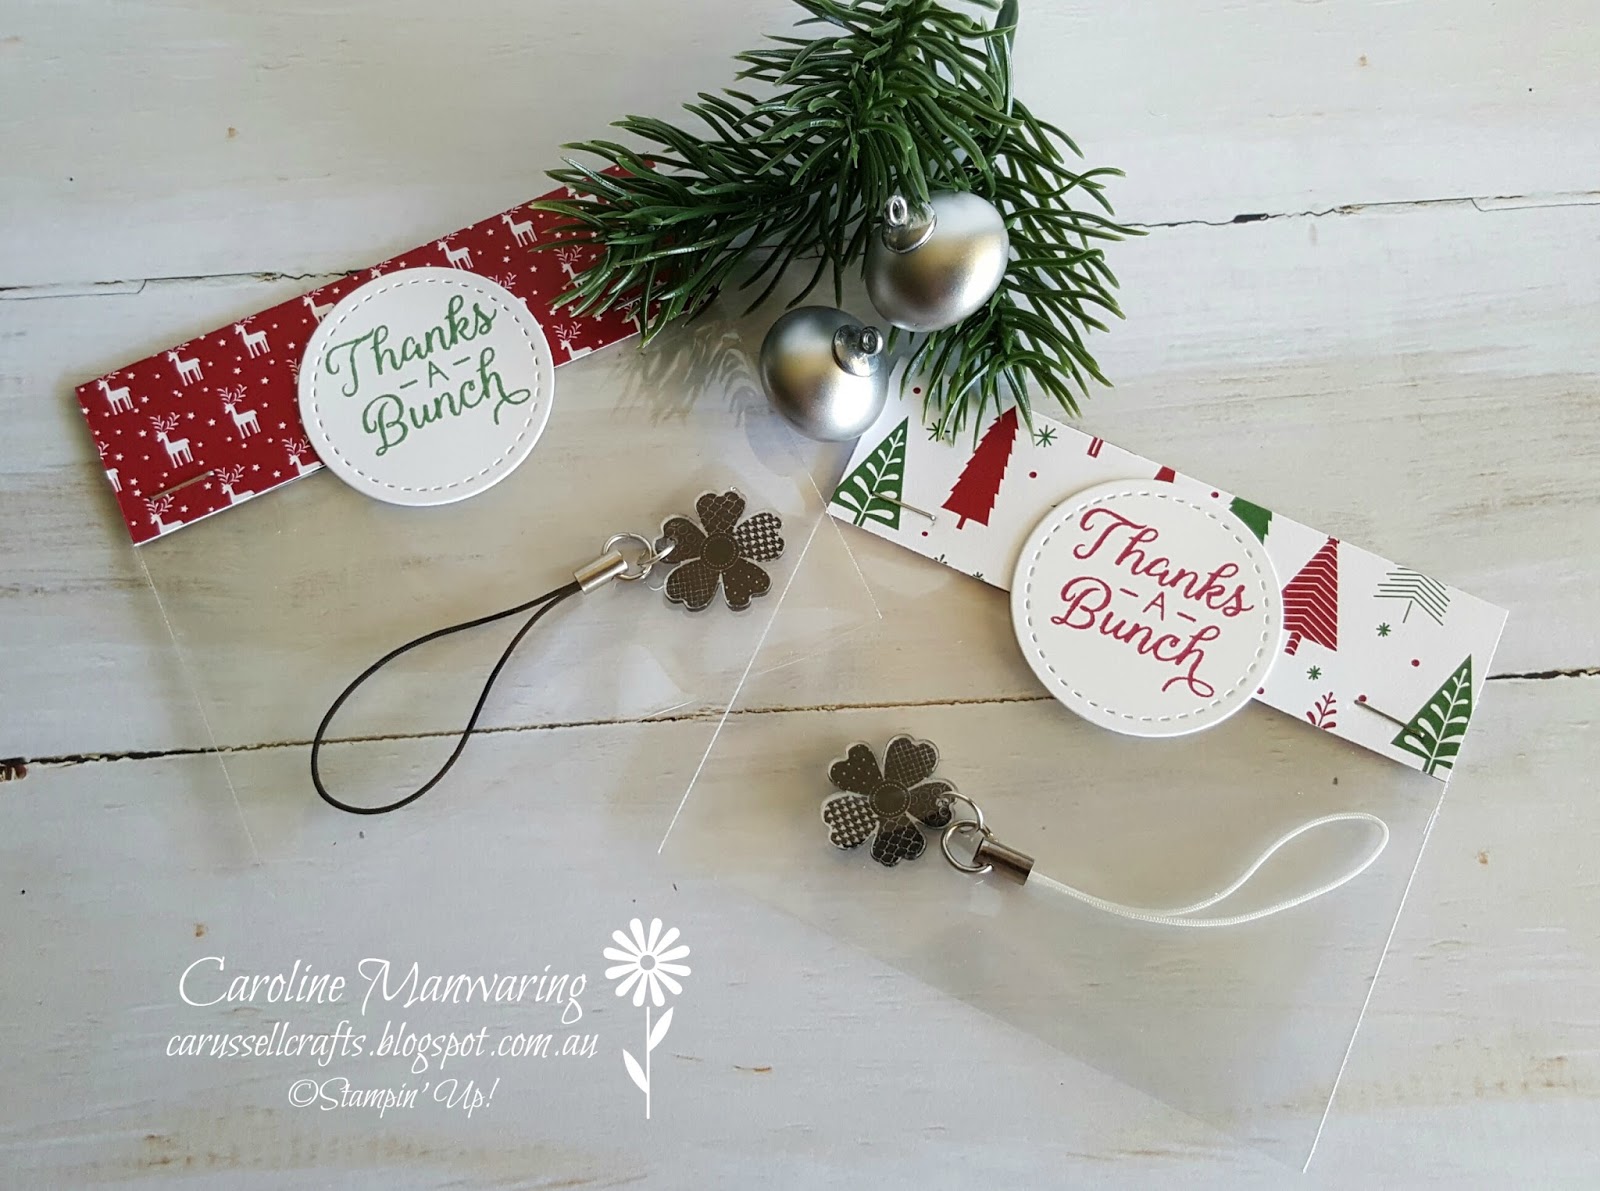
Next I made each of the ladies a little scissor or mobile phone charm.
I stamped one of the 'Flower Shop' stamps onto some Shrinky Dink plastic with Memento ink, punched a hole and heat shrunk using the heat tool. I purchased the cords from my local discount shop and I matched the DSP to the bon-bons. The sentiment I used is from the 'Beautiful Bouquet' stamp set and I have cut it out with the smallest stitched circle. I used Garden Green and Cherry Cobbler for the ink colours.

The ladies really loved their little chocolate and keepsake and we had a wonderful day for our last class of the year. I have called them ladies, which they are of course, but they have also become lovely friends and we always have such a fun time at our classes.

Busy making their projects.


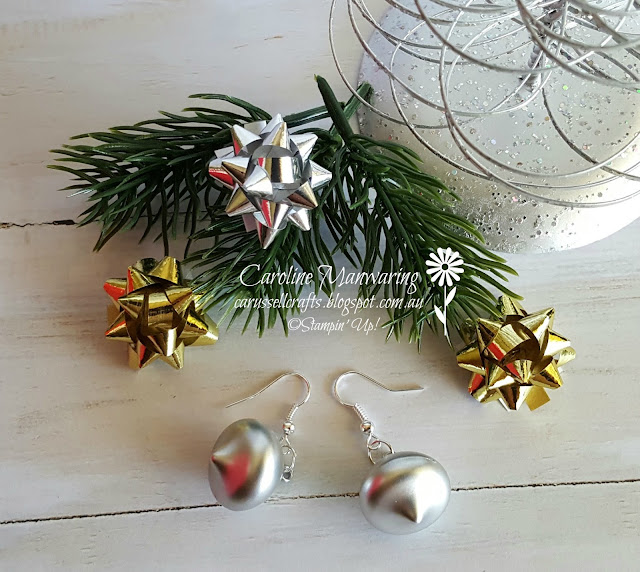
I wanted to wear some Christmas bling and I'm pleased to say it was Stampin' Up! too!!!
These are the Mini Ornaments from the Christmas/Holiday Catalogue and I have made them into some earrings.

Wishing everyone a very Merry Christmas and a happy and healthy 2018.
🎄

Please stop by from time to time to see what I've been up to in my paper crafting and if you would like to leave me a comment, I would love to read them.

Let's hop over to Claire Daly's blog now to see what she and the other team members have created for their last Heart of Christmas projects.

Until next time.....
Stay happy & stay crafty! 😘


Sunday 26 November 2017

Merry Music Tree Ornament


Happy Sunday everyone, I hope you're enjoying your day. I'm having a lazy Sunday, and I even got out of having to cook lunch, my husband and I went out and we had a lovely roast beef meal.

I'm spending time in my craft room this afternoon and I have been wanting to make this ornament for such a long time, that I finally got the chance to sit down and make one.


It's called a woven star tree ornament. It uses 1/2" x 6" strips of paper and other than a bit fiddly to put together, it is fairly quick and simple. I knew just the DSP I wanted to use and it turned out just as I had imagined it would. I love it! I think it is just gorgeous and shows off the designs in the paper perfectly. I have used the Merry Music Specialty DSP from the Holiday Catalogue. Perhaps the black and white is not to everyone's taste for Christmas colours, but the focus is on the paper itself. 


Here is a close up photo and you can see that I have used a clear faceted gem in the centre and then clear and black rhinestones on each of the points. I punched a hole for the hanger at the top and one for the bow and tassel at the bottom. (The tassel is a retired one) I really had fun making this today, even if I did get a little sticky with the Tombow. I have a list of the products I used to make it below.

Thanks for stopping by today, enjoy the rest of your weekend.

Until next time.....
Stay happy & and stay crafty! 😘


Thursday 23 November 2017

AWH Team - November blog hop - Adding texture with embossing


Welcome friends to our Art With Heart team's November blog hop. Tonight the girls are sharing some creative projects by adding texture with embossing. Embossing can add a lovely dimension, and with our wonderful Stampin' Up! products, we can create many different looks. These include heat embossing using embossing powder, dry embossing using our textured folders or by adding embossing paste! I hope you're just as excited as me to see the beautiful creations, so let's get started!


My projects today include both dry and heat embossing. On the card pictured above, I ran a piece of the Wood Textures DSP through the Big Shot using the Sweetheart TIEF. I love how this embossing looks on the wood textured background and the way that the heart shape is left plain. The next part of the embossing technique was to stamp directly onto the DSP with Versamark and cover this with gold embossing powder and then heat set with our Heat Tool. Watching the powder turn from dull to magnificent shining gold is still magic to see. I've also heat embossed the wrap around the bouquet and the little tag. I have made this 5" x 5" card for a friends birthday and the 'Beautiful Bouquet' stamp set was a perfect choice for it. The set has all of the gorgeous flowers you see as well as lots of wonderful greeting and sentiments, including the two that I've used. The flowers were die-cut using the coordinating framelits. The heart shaped frame was made using the Sweet & Sassy Framelits. Complimenting the Whisper White card base is Real Red which is one of my friends favourite colours. Other embellishments I've used are some rhinestones and linen thread, and Wink of Stella over the flowers.


Another fun thing to do is emboss the back of the envelope to match your card. Here I have again used the Sweetheart TIEF and added a metallic enamel heart.


For my second card I have used the Holly embossing folder on both the centre panel and larger white layer. I cut 1/2" strips of silver, copper, champagne and gold foils and and glued these onto a piece of regular Whisper White cardstock, butting them up against each other. I then cut the whole piece out using a stitched shape square and backed this with a square of copper foil as with the larger embossed piece. The sentiment is heat embossed in silver and is from the 'Flurry of Wishes' stamp set. The outside border is heat embossed in copper and this image is from 'Label Me Pretty' and cut out with the coordinating Pretty Label punch. I have embellished with a gold faceted gem, some copper trim and silver metallic edged ribbon.


You can even emboss our tiny treat box lids and it looks so sweet. Heat emboss a little greeting, add some more copper trim, a bit of washi tape, a gem and you have a gorgeous little matching gift box to go with your card. This would make a lovely gift set to give to a special stamping friend.


And of course, don't forget that matching embossed envelope too! 😊

Well that's it from me, I hope you have enjoyed seeing my projects as much as I enjoyed making them.
Next up in our hop is the lovely and talented Monika O'Neill and I can't wait to see what she has created.


AWHT Blog Hop Next blog button

If you find a broken link or have come to this hop from a different entry point, you can view the participants below:


And as always, until next time.....
Stay happy & stay crafty! 😘


Wednesday 22 November 2017

The Heart of Christmas - Week 26


Hello friends and welcome to Week 26 of The Heart of Christmas from the Art With Heart team.
I can hardly believe that this is our second last weekly blog post of sharing our Christmas inspiration projects with you all, where has the time gone?! I don't know about you, but I haven't even started my Christmas shopping yet! At least all of my Christmas cards are made and it will just be a matter of writing in them and sending them off. 

Here is my card for this week.

Festive party lights in a gum tree is what this stamped image reminds me of. I can imagine tables and chairs set out underneath it in the cool of the evening, with platters of sliced cold meats and large bowls of yummy salads, the type you only make at Christmas time and a big, colourful trifle for dessert. Games of backyard cricket and splashing in a pool, squeals of joy and laughter from children playing with their presents, and all gathering together to enjoy the spirit of an aussie Christmas. 
My tree is from the 'Sheltering Tree' stamp set and I have heat embossed the leaves in silver embossing powder and the trunk in copper. The colourful enamel dots represent the party lights. I've used the layering square framelits to die-cut this image and the silver foil backing square. The garland is from 'Merry Mistletoe' and stamped in Smokey Slate and the sentiment is from 'Flurry of Wishes' and heat embossed in silver and also backed with a piece of silver foil. 


Inside the card I've stamped another image from the 'Merry Mistletoe' set in the Smokey Slate and added a strip of the Year of Cheer washi tape to the top and bottom of the panel.

I'd love you to join me again next Wednesday for the last week of The Heart of Christmas.
But right now you can hop over to the blog of our team leader Claire to see what she has created, and you'll also find a list of this weeks other contributors from our team.

Until next time.....
Stay happy & stay crafty! 😘


Wednesday 15 November 2017

The Heart of Christmas - Week 25


Welcome friends to Week 25 of The Heart of Christmas from the Art with Heart Team.

I really enjoyed making this weeks cards and I hope you'll enjoy them too and have a go at making some yourself as they are really easy and fun.


I have used the Quilted Christmas 6" x 6" DSP stack from our Christmas/Holiday Catalogue to create the tree branches, which I've cut out using the triple banner punch. They're all 1/2" wide strips and measure 4" for the longest and 1/2" shorter for each one after that - roughly. Just trim with the punch until your happy with each length. I ran a piece of the copper Year of Cheer washi tape down the centre of the Whisper White card base front and then just layered the strips on slight angles. The tree base is cut from a piece of Soft Suede cardstock using the largest triangle from the Quilt Builder Framelits, and I wrapped another piece of washi tape around the middle of this and stuck the tails at the back so that it had a neater finish on the sides. The sentiment is stamped in Real Red and is from the 'Teeny Tiny Sentiments' stamp set, and it's cut out using the Classic Label punch. I coloured two of the smallest basic pearls in Cherry Cobbler using an old (*no longer available) blendabilities marker, and added these to the punched out sentiment.
***You can now purchase the brand new Stampin' Blends markers***
Just click on my Shop With Me button in the right hand side bar and it will take you to my online shop where you can see the gorgeous colours available.


I used copper foil to cut the star from the Wood Crate Framelits and I've added a small rhinestone to the centre.


This is how I cut the base for the tree.


On the inside layer I added strips of the DSP to the top and bottom and popped a little rhinestone onto each centre. The sentiment is stamped in Real Red and is from the 'Christmas Quilt' stamp set.


My second card is the same design just using some different colours and patterns from the DSP. I've added a linen thread bow to the tree base and sentiments are stamped in Soft Suede. This time I popped the tree base up on dimensionals.


On the inside of this card I added the DSP strips again and punched out a little motif using the 1/2" circle punch and popped a rhinestone in the centre of this. I think it looks really cute.

Thanks for stopping by today, hope to see you back again next Wednesday for Week 26.

To see more Christmas inspiration hop over to Claire's blog to see what she has made and the list of team members who have shared their designs with us all this week too.

Until next time.....
Stay happy & stay crafty 😘


Sunday 12 November 2017

Happy Birthday - Beautiful You and Stampin' Blends

Hi friends, thank you for stopping by, I hope you've all had a lovely Sunday.
I've had my first try at using the new Stampin' Blends today, and I have to say I LOVE THEM!
I only purchased a few colours just to start with, but I'm certainly going to order more.

And so, without further ado, here is the card I made.


I decided to use one of the images from the 'Beautiful You' stamp set and I'm so pleased with the result, it was really easy to colour. I watched a few YouTube videos and learnt that the best ink to stamp the image is Memento tuxedo black, then leave it to dry for a few minutes before colouring. I chose Pink Pirouette in both the dark and light shade, starting with the lighter and then adding the darker highlights and going back over these with the lighter shade again to blend.


It's a very subtle colour, but you can just make out the darker lines in this close-up pic.

I used the layering ovals to cut out the image and Sweet Sugarplum C/S and the Dazzling Diamonds glimmer paper using one of the scalloped ovals. I chose to match it with some of the gorgeous patterns from the Petal Garden DSP stack, this is a 6" x 6" pack and my card base is Whisper White. The card size is 5 1/2" x 4 1/8".


I heat embossed the sentiment in copper and it is from the 'Special Celebrations' stamp set. Our copper embossing powder goes beautifully with the Sweet Sugarplum.


Other embellishments I've used are the 3/8" Shimmer Ribbon in Powder Pink and a few of the Glitter Enamel Dots.


Inside I layered a piece of Whisper White onto Sweet Sugarplum and stamped the matching sentiment to the greeting on the front of the card.

I am really looking forward to playing with some more of the colours in our Stampin' Blends markers, and I'll be sure to share the projects I make with them here on my blog.

If you don't already have a Stampin' Up! demonstrator and you live here in Australia, I would be tickled pink if you would like to choose me as your demonstrator. Just send me an email or contact me by phone, I'd be happy to help you with any questions you might have. You can find my mobile number on my online shop - just click the Shop With Me button in the right hand column.

Well that's it for today, it's getting late in the evening and I think I need a coffee. 😊

Until next time.....
Stay happy & stay crafty 😘


Wednesday 8 November 2017

The Heart of Christmas - Week 24


Hi friends and welcome to Week 24 of the Heart of Christmas from the Art with Heart Team.
It's almost a wrap on our christmas inspiration blog posts with just three more to go after this one, so I'll get on with sharing today's card with you. 

I decided to use the Foil Frenzy DSP again this week, and this time I've used Berry Burst.


The card is basically the same design as last weeks, where I've used the 'Painted Harvest' sunflower to create the wreath using Powder Pink and Berry Burst. I stamped the berries and then placed rhinestones over the top and added the Smoky Slate gingham bow, and cut out with a stitched square. The Merry Christmas is from the 'Teeny Tiny Sentiments' stamp set, which is heat embossed in silver and I've used the Classic Label to cut this out and the two pieces of Foil Frenzy that I just overlaid on top of each other to create the extended look, and finished off with two clear Faceted Gems.


Inside I added a piece of Crumb Cake and two strips of the Foil Frenzy DSP to the top and bottom.
The sentiment is from the 'Merry Mistletoe' stamp set and stamped in Berry Burst.


Thanks for stopping by today, if you pop over to Claire's blog you'll be able to see what she has made this week and a list of team members who contributed to Week 24 of the Heart of Christmas.

Last weeks card
Week 23

Until next time.....
Stay happy & stay crafty! 😘