Wednesday 30 October 2019

Heart of Christmas - Week 11


Hello everyone.

Welcome to Week 11 of the Heart of Christmas.

We hope you're finding lots of inspiration from the projects that the Art With Heart Stampin' Up! Team have been sharing with you all.

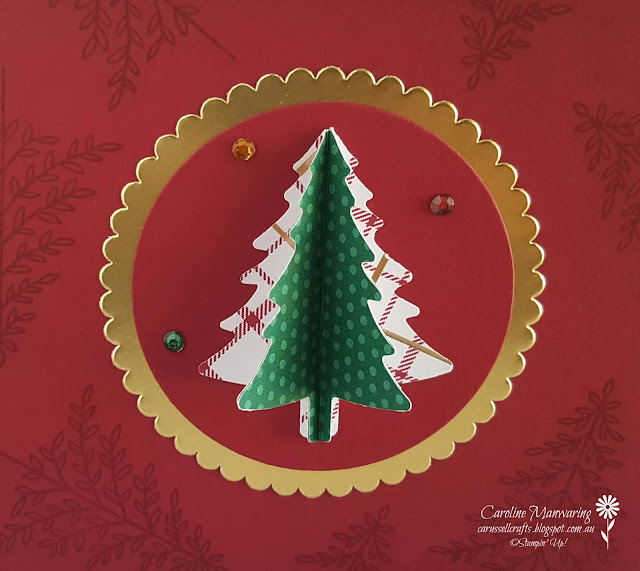
Here is my project for tonight - a decorated tissue box cover.


I seem to be featuring a lot of projects lately where I've used products from the Wrapped In Plaid Suite, so I hope you won't mind seeing a few more. This tissue box cover was actually one of the creations we made at my last card class. We also made two lovely cards that coordinate with it, and I'll share those with you all soon.

The tissue box cover is made in two separate pieces - the base and the lid.


For the base, you will need:
  • 2 pieces of cardstock that measure 5" x 9 1/4" - Score along the 9 1/4" side @ 1/2" and 4 3/4" on both pieces. (You could stamp an all-over pattern, as I have done, or cover with DSP). 
  • Angle trim the top and bottom of the 1/2" tab section on both pieces, join one tab edge to a straight edge and then the remaining tab and straight edge to form your box. 

For the lid, you will need:
  • 1 piece of cardstock that measures 6 5/16" x 6 9/16" - Score @ 1" on all four sides and trim out the tabs as shown in the photo below.
  • DSP for the top of the box measures 4 3/8" x 4 1/8" - (Glue in place before cutting the centre circle). You will need a circle die that measures 2 3/8" in diameter to cut the hole in the top. (You will need to fold under one side edge to run through a die-cutting machine). If you centre it precisely, you won't cut the edge with the die. 
  • DSP for the sides of the lid measure 2 @ 4 3/8" x 7/8" and 2 @ 4 1/8" x 7/8".
  • For the scalloped outer circle frame - use a piece of cardstock that measures at least 3 1/2" square. Using a 3" scalloped circle die and the 2 3/8" regular die, centre these on top of the 3 1/2" square of cardstock and die-cut. (You could use the left-over circle to decorate, as I did).

To make the 3D Christmas tree, I punched out three trees from the Wrapped In Plaid 6" x 6" Specialty Designer Series Paper with the Pine Tree Punch. (Because the tree is not symmetrical, I reversed the pattern on the middle tree so that it matched the edges). Fold the trees in half and glue a right hand underside to a left hand underside, repeat to create a 3D tree, then glue the two remaining right and left sides, flat to the circle. Hope this makes sense.

The all-over stamping is the outline tree in the Perfectly Plaid stamp set.

The rhinestones are from the Holiday Rhinestone Basic Jewels pack.


A  piece of festive home decor from me tonight, for a little something different.

This tissue box cover was designed to fit the Kleenex brand, cube size tissues. The box measurements are about 4 1/2" x 4" x 5".


The lovely Tina Gillespie is hosting our Heart of Christmas blog hop tonight. You can see what she has created, and the list of the other team participants by clicking here.

Enjoy!

Thank you for stopping by tonight.
If you're leaving a comment below, thank you so much.
I read and appreciate them all. 💗

See you next time 😘


Thursday 24 October 2019

Embossing Folders - AWH Team - October Blog Hop


Hello everyone and welcome to our October blog hop by the Art with Heart team.

This month we are featuring Stampin' Up!'s versatile range of Embossing Folders. There are new Embossing Folders available in every Stampin' Up! catalogue, and they are an inexpensive way of adding WOW to your projects!
There are currently 24 different Embossing Folders in our range, and tonight the team will be showing you lots of ideas on how to use them.

I have chosen my most favourite of all our embossing folders to feature on my projects tonight - the Subtle 3D Embossing Folder. As the name suggests, it leaves a subtle texture when embossed and is suitable for any occasion card or project.

Here's what I've created.


First up is my card. I wanted to use pastel colours and afterwards I thought how sweet this would be for 'Baby's First Christmas'. These colours could be used for either boy or girl, and you could swap them around so you have a pink base for the card.
In our Annual Catalogue we have a set of 20 Scalloped Note Cards & Envelopes in Balmy Blue, Old Olive, Light Pink and Terracotta Tile, and I've used both the pink and blue to create my card.
I simply cut the pink card in half. I glued the scalloped piece to the underside of the blue card front to get the little pink edge that you can see and then I added a strip of Silver Glimmer paper to the bottom of the scalloped edge.


With the left over pink piece, I die-cut it with a Rectangle Stitched die first and then ran that through the Subtles 3D embossing folder. I've matted it onto a piece of Silver Glimmer paper. I stamped two of the trees from the Perfectly Plaid stamp set in Balmy Blue ink and punched out with the Pine Tree Punch. (The stamp set and punch are available as a bundle with 10% off). I then ran one of the trees through the Subtles embossing folder too, only this time I had it running vertically. I've also embossed the flap on the matching envelope - such is the versatility of this wonderful embossing folder. I have heat embossed the sentiment in Silver embossing powder and it is from the Itty Bitty Christmas stamp set. I have embellished with rhinestones, gems and a bow made from our flax ribbon.


I had a strip of the pink card left over so I ran that through the embossing folder as well and added it to the bottom of the inside of the card. I usually have a white writing panel but decided to go with a Balmy Blue one this time.

Here is my next creation.


I used the Tiny Keepsakes Bundle to make my little box to match the card and envelope. The versatility of our embossing folders is only in our imagination. I now have a sweet little gift set to give to a friend this Christmas.


Here is the same card using the other two colours in the Note Card pack.


I can't wait to see what the other team members have created with their favourite embossing folders for our blog hop tonight.

Click the 'next blog' button below to visit the lovely, Rachel's blog.


If you find a broken link or have come to this blog hop from a different entry point, below is the list of tonight's participants.


Caroline Manwaring  <<< you are here >>>


Thank you for stopping by tonight.
If you're leaving a comment below, thank you so much.
I read and appreciate them all. 💗


See you next time... 😘


Product List


Wednesday 23 October 2019

Heart of Christmas - Week 10


Hello and welcome everyone to Week 10 of the Heart of Christmas with the Art with Heart Team.

I've chosen a Z-fold design for this week's card.


For the front of the card I have used one of the patterns from the Feels Like Frost 6" x 6" Specialty Designer Series Paper. This particular pattern has lovely purple hues throughout, so I chose Purple Posy and Night of Navy to compliment it, and I've featured the stamp set and punch from the Perfectly Plaid Bundle.
I stamped one tree, tone on tone onto Night of Navy, and the other tree was heat embossed onto some Vellum using the sparkly Shimmer White embossing powder. Then I punched them out with the Pine Tree Punch. I added them to a Stitched Shape circle in Vellum using dimensionals. The lovely sentiment from the Perfectly Plaid stamp set, was stamped in Night of Navy ink onto Whisper White cardstock and die-cut with a Stitched Rectangle die. I matted this onto a piece of Night of Navy CS.


In the photo above, you can see that I added a few basic rhinestones to the front of the card for some extra sparkle and the Night of Navy tree has Wink of Stella leaves. The 'Z' part of the card is the Whisper White scored panel. There are lots of styles of this type of fun-fold design and I found this one on Pinterest.


To the middle panel of the card I added the stamped 'Merry Christmas' in Night of Navy, die-cut with a Stitched Rectangle die, and matted with another stitched rectangle in Night of Navy cardstock. I stamped the Christmas tree directly onto the writing panel and added Wink of Stella to the leaves. This photo gives you a better look at how the card is constructed.

I love the combination of colours on this card for a non-traditional look and feel.


Thank you for stopping by. It's time to see what Claire has created this week. Check out her blog by clicking here. You'll also find a list of tonight's participants from the team at the end of Claire's post.

Hope to see you all again for Week 11 of the Heart of Christmas next Wednesday night.

If you're leaving a comment below, thank you so much.
I read and appreciate them all. 💗

See you next time...😘